Quantcast
Channel: credentiality
Viewing all 94 articles
Browse latest View live

Why are there only pi nits in a hemisphere? (Or, why do my reflected and incident light meters show a ratio of pi?)

$
0
0
I just spent about a week trying to sort out why people kept claiming that surfaces with a given radiance (or luminance) emit pi times as much light over a hemisphere, when there are in fact 2*pi steradians in a hemisphere.  Here's what I learned.  Special thanks to my friend Mike for helping me figure it out!

Quick overview of light units:

Radiance / Luminance (and their neighbors) are analogous to each other.  The radiance units weight photons based on their energy, while the luminance units weight photons based on human visual response.

Radiant flux (Watt) / luminous flux (Lumen): "I have a 1W LED"

Radiant intensity (Watt per steradian) / luminous intensity (Candela): "I have a 1W LED focused in a 33 degree cone"

Irradiance (Watt per square meter) / illuminance (Lux): "I put my 1W LED in a soft box whose front surface is 1m by 1m"

Radiance (Watt per square meter per steradian) / Luminance (Nit, or cd / m^2): "I measure 1uW of light being emitted from a 1 mm square patch on my soft box into a 33 degree cone perpendicular to its surface" BUT with a major catch (read on)

Leading up to The Major Catch:

Incident light meters (the ones with a white dome) collect light from a broad area and report it as lux.  I think of it as "if I had an ideal 1 square meter solar cell, this is how many watts it'd put out (or how many photons it'd receive per second) given the current ambient lighting".

Reflected light meters (when you look through the 1 degree eyepiece) tell you how much light is coming off of a surface.  If you're shooting something with a dark color, you'd rather know how much light is coming off it than how much it's receiving, since you probably don't know its BRDF.  Reflected light meters report in nits, or candela per square meter, or to expand fully: lumens per steradian per square meter.

This Sekonic L-758Cine is the one I have.  (Its lower priced siblings, unfortunately, won't report in lux or cd/m^2, but only in terms of camera settings)


The Major Catch:

So intuitively, we should be able to use an incident light meter to measure the ambient light coming off, say, a wall, and get, say, 2*pi lux.  We could (wrongly) assume it's emitting equally in all directions, and since we know that there are 2 pi steradians in a hemisphere, say that the wall has luminance of 1 lumen per square meter per steradian.

That actually seems completely reasonable, so I'm not sure why I felt the need to check that experimentally, but I'm glad I did.  I turned on a big soft box and measured a tiny patch of it using the reflected light meter.  Then I switched to incident mode and put the dome right up next to the center of the box, expecting the lux to be 2*pi as large as the nits.

But that's not what I got.  In fact it was closer to a ratio of 2, but if I squinted just right I could get a ratio of pi.  But definitely not 2 pi.  I repeated the experiment on a nearby wall and got even closer to a ratio of pi.  WTF?

Searching online I came across quite a few instances of people saying that the ratio of illuminance to luminance is indeed pi for a flat Lambertian surface.  Now that really baked my noodle.  How could a surface emit a certain number of photons per second per steradian into a 2 pi steradian hemisphere and come up with anything other than 1/(2pi) per steradian?  And what's the deal with Lambertian surfaces?

Lambertian surfaces are surfaces that have the same brightness no matter what your angle to their normal is.  That means they're isotropic emitters, right?  Nope!  Look at a business card square on, then angle it away from you.  Your eye perceives it as having the same brightness in both cases, but in the second case, the card subtends a smaller angle in your vision even though you're still seeing the entire card.  If each photon were to leave the card in a uniformly random direction, you'd receive just as many photons from the card when you viewed it obliquely as you did when you viewed it straight on.  Since it's foreshortened when you view it from an angle, you'd get the same number of photons in a smaller solid angle, and the card would appear brighter and brighter (more photons per steradian) the more you angled the card.

So for the card to have the same brightness at any angle and thus qualify as a Lambertian surface, the card must emit less light the further away from perpendicular you get, to compensate for the fact that the card's solid angle is shrinking in your view.  That brightness reduction turns out to be cos(theta), where theta is the angle between your eye and the surface normal.


Page 28 of the Light Measurement Handbook has some good diagrams and explanation on this topic: http://irtel.uni-mannheim.de/lehre/seminar-psychophysik/artikel/Alex_Ryer_Light_Measurement_Handbook.pdf

It turns out that lots of things in nature are more or less Lambertian surfaces, which is pretty convenient for us -- it means things look about the same as we walk past them.  And it means we have an accurate sense of how bright something is regardless of what angle we're seeing it from.  It's interesting to imagine a world where most surfaces were very non-Lambertian and wonder how that might screw up us carbon-based lifeforms.  But I digress.

Imagine a 1m^2 patch of glowing lambertian ground covered by a huge hemispherical dome.  The patch of dome directly above our glowing ground will receive the most light, and the perimeter (horizon) of the dome will get none, since it's looking at the ground on-edge.  When aimed straight up, let's say we get radiance of 1W per square meter per steradian, falling to zero at the horizon.  (Note that we could aim our reflected light meter at the patch from anywhere -- regardless of angle or distance -- and read the same value, thanks to the fact that the surface is lambertian.  The reduced light as we go toward the horizon will be perfectly balanced out by the foreshortened view of the patch, so the meter will report a constant value of lumens per steradian per square meter).

Let's integrate over the dome to find the total emitted power.  We'll slice the dome with lines of latitude, so that the bottom slice is a ring touching the ground, with a slightly smaller diameter ring on top of it, going up toward the north pole as the rings get smaller and smaller.  Kind of like slicing up a loaf of bread and then putting the end of it heel-up on the table.


The point in the middle of our glowing patch of ground is the center of the hemisphere.  Let theta be the angle between the north pole and the circumference of a given ring.  Then the radius of that ring is sin(theta), and its circumference is 2*pi*sin(theta).
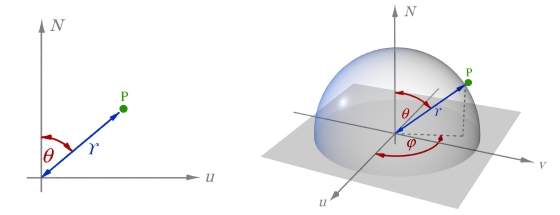
The width of the ring is d*theta, and the radiance of the light hitting the ring from the glowing patch is cos(theta).  Multiply them together and we get power radiated through the ring.  Add it up for all the rings and we capture all the power being emitted by the glowing patch:


So our lambertian surface with radiance 1W / m^2 / sr emits a total of pi watts over a hemisphere, even though a hemisphere consists of 2 pi steradians, and even though we can measure that 1W / m^2 / sr radiance from any angle!  The reason that seeming paradox happens is that the constant radiance is a result of less light over a smaller angle.  The north pole sees the entire patch and thus gets the most light, whereas the horizon sees the patch from the edge and sees only a thin sliver of light.  Add it all up, and you get half as much light as if the dome were being uniformly lit everywhere.

Shiny spheres

$
0
0
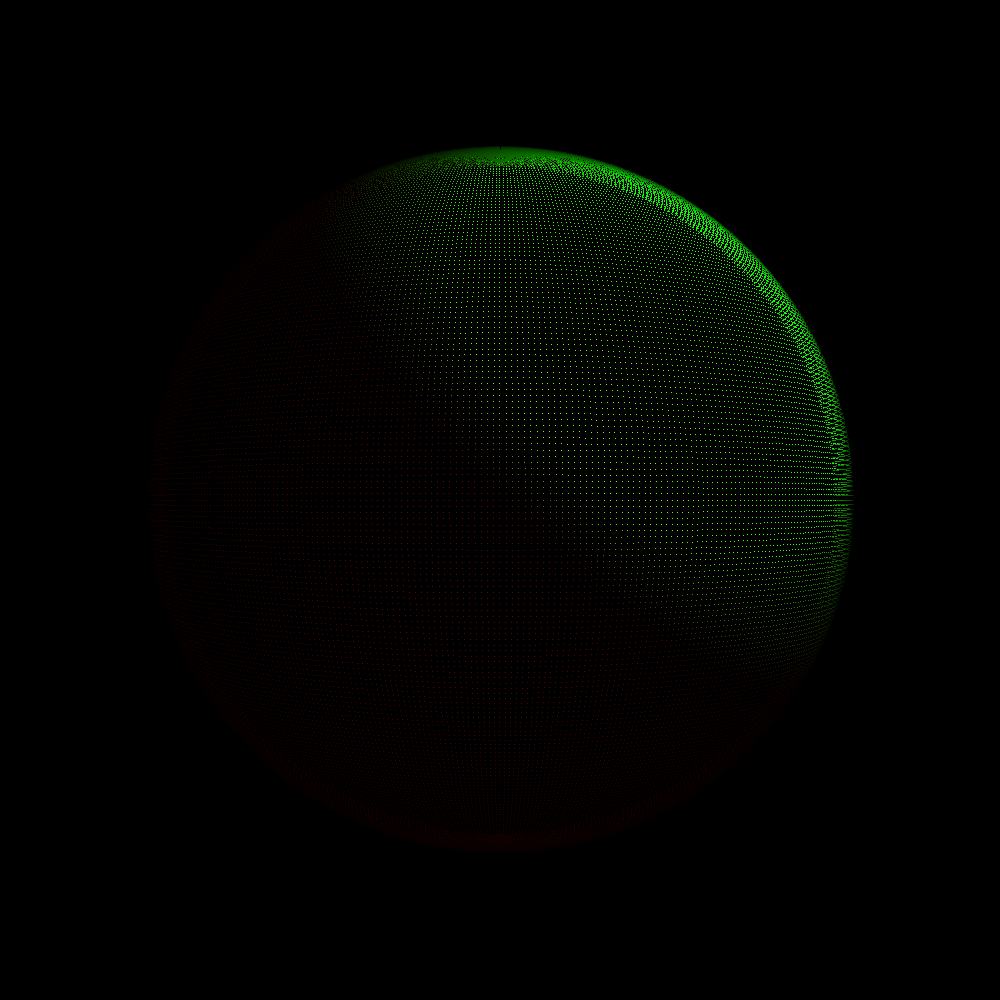
My friend told me that many years ago, she lost points in an MIT art class for putting the highlight in the wrong place on a sphere.  So when she saw my last post about radiance, she posed the question to me.

Turns out the answer is (-0.24,-0.25,-2.06).


Here's one where I moved the light source and just liked how it looked (before I added specular reflection):


// Projects a sphere onto the screen with ambient, diffuse and specular
// lighting, and prints the location of the specular highlight.
//
// Viewpoint is 0,0,0
// Screen is from -1,-1,-1 to 1,1,-1
// Sphere is at 0,0,-3 with radius 1
// Light source is at -1,-1,0 and projects
//
// Surface of the sphere emits ambient light in red, specular reflection in green and
// diffuse reflection in blue.
//
// Compile with gcc -o sphere sphere.c -lm -lfreeimage
// and make sure you have the libfreeimage-dev package installed.

#include <stdio.h>
#include <math.h>
#include <FreeImage.h>
#include <stdlib.h>

#define IMAGE_WIDTH 1000
#define IMAGE_HEIGHT 1000
#define SAMPLE_DENSITY 300

FIBITMAP *image;

void setup_image() {
  FreeImage_Initialise(FALSE);
  image = FreeImage_Allocate(IMAGE_WIDTH, IMAGE_HEIGHT, 24, 0, 0, 0);
  if (image == NULL) {
    printf("Failed to allocate image.\n");
    exit(1);
  }
}

void setpixel(double x, double y, double r, double g, double b) {
  RGBQUAD color;
  const double brightness_boost = 40.0;

  int red = fmin(r * 255 * brightness_boost, 255);
  int green = fmin(g * 255 * brightness_boost, 255);
  int blue = fmin(b * 255 * brightness_boost, 255);

  color.rgbRed = red;
  color.rgbGreen = green;
  color.rgbBlue = blue;
  FreeImage_SetPixelColor(image, x * IMAGE_WIDTH + (IMAGE_WIDTH / 2),
                                 y * IMAGE_HEIGHT + (IMAGE_HEIGHT / 2), &color);
  //printf("%lf,%lf\n", x, y);
}

void teardown() {
  FreeImage_Save(FIF_PNG, image, "out.png", 0);
  FreeImage_DeInitialise();
}

int main(int argc, char **argv) {
  const double pi = 3.14159;

  const double sphere_z = -3;
  const double light_x = -1;
  const double light_y = -1;
  const double light_z = -1;

  const double light_brightness = 1;
  const double specular_reflection_exponent = 10;
  const double reflected_brightness = 500;
  const double ambient_brightness = 0.2;

  double latitude;
  const double latitude_elements = SAMPLE_DENSITY / 2;
  const double latitude_step = pi / latitude_elements;

  setup_image();

  // For MIT's art department, keep track of where the specular highlight looks brightest
  double max_reflected_value = 0;
  double highlight_x = 0;
  double highlight_y = 0;
  double highlight_z = 0;

  // Walk over the sphere and compute light from the source and to the viewpoint at each spot.
  for (latitude = 0; latitude < pi; latitude += latitude_step) {
    double y = cos(latitude);

    double longitude;
    const double radius = sin(latitude);
    const double circumference = 2 * pi * radius;
    const double longitude_elements_at_equator = SAMPLE_DENSITY;
    const double longitude_step = (2 * pi) / longitude_elements_at_equator;

    for (longitude = 0; longitude < pi; longitude += longitude_step) {
      double x = radius * cos(longitude);
      double z = radius * sin(longitude);
      // Now we have x,y,z relative to the sphere center.  To get absolute coordinates,
      // we just have to translate in z, since the sphere is at 0,0,sphere_z.
      double absolute_z = z + sphere_z;

      double distance_to_viewpoint_squared = x*x + y*y + absolute_z*absolute_z;
      double distance_to_viewpoint = sqrt(distance_to_viewpoint_squared);

      // Dot product is x1x2 + y1y2 + z1z2 and yields cosine of the angle between
      // them if they're both normalized.
      // But x1=x2 and y1=y2, and |x,y,z|=1, so we only need to normalize by
      // distance_to_viewpoint.
      // This dot product is between the viewpoint and surface normal
      double view_dot_product = (x*x + y*y + (absolute_z * z)) / distance_to_viewpoint;

      // Now we'll calculate the dot product for the light source.
      // First, the vector from the sphere surface to the light
      double lx = light_x - x;
      double ly = light_y - y;
      double lz = light_z - absolute_z;
      double light_distance_squared = lx*lx + ly*ly + lz*lz;
      double light_distance = sqrt(light_distance_squared);
      // Now we can compute cos(angle to the light)
      double light_dot_product = (lx*x + ly*y + lz*z) / light_distance;
      // Cosine law for intensity and inverse square law
      double light_intensity = fmax(light_dot_product, 0) / light_distance_squared;
      // Reflection of light vector is light - 2(light dot normal)*normal
      // (also normalizing here)
      double reflected_x = (lx - 2*light_dot_product*x) / light_distance;
      double reflected_y = (ly - 2*light_dot_product*y) / light_distance;
      double reflected_z = (lz - 2*light_dot_product*z) / light_distance;
      // Now we compute cos(angle between reflection and viewpoint)
      double reflected_dot_product = (reflected_x*x + reflected_y*y + reflected_z*absolute_z)
        / distance_to_viewpoint;
      reflected_dot_product = fmax(reflected_dot_product, 0);
      // Raise to a power based on how shiny the surface is
      double reflected_intensity = pow(reflected_dot_product, specular_reflection_exponent);
     
      // Lambert's Law and inverse square law to viewpoint
      double view_intensity = fabs(view_dot_product) / distance_to_viewpoint_squared;

      double light_value = light_brightness * light_intensity * view_intensity;
      double ambient_value = ambient_brightness * view_intensity;
      double reflected_value = reflected_brightness * view_intensity * reflected_intensity;

      //printf("light:%.4lf ambient:%.4f\n", light_value, ambient_value);

      // If the sphere is lambertian, then the cosine of the angle between the surface
      // normal and the viewpoint gives the intensity.
      double projected_x = x / absolute_z;
      double projected_y = y / absolute_z;

      //printf("[lat=%.02lf lng=%.02lf (%.02lf,%.02lf,%.02lf) ", latitude, longitude, x, y, z);
      setpixel(projected_x, projected_y, ambient_value, reflected_value, light_value);

      if (reflected_value > max_reflected_value) {
        max_reflected_value = reflected_value;
        highlight_x = x;
        highlight_y = y;
        highlight_z = absolute_z;
      }
    }
  }

  printf("Brightest specular highlight was at (%.02f,%.02f,%.02f)\n",
      highlight_x, highlight_y, highlight_z);
  teardown();
  return 0;
}

Maker Faire 2014 Highlights: Miscellaneous

$
0
0
AeroTestra has a fully waterproof UAV with 20 minutes of flight time.  They’ve instrumented it with water quality sensors and measured local bodies of water for salinity.


TechGyrls is a collaboration of the YWCA of Silicon Valley, Intel and TechShop to create an after-school program just for 5-14 year old girls.

GIGAmacro sells a gigapixel macro imaging rig for a few thousand dollars.  They put a DSLR camera on a 3-axis gantry rig the size of a Shopbot Buddy then take hundreds of photos, merging them into a single wide depth of field image using Zerene and AutoPano.  This is very much like Google’s Art Project scans of famous paintings, but with more Z-axis capacity.  So it’s a sort of combination large flatbed scanner and microscope.

Screenshot from 2014-05-18 18:40:11.png

This 70 pound 3d-printed vehicle is really quite impressive in person.  This isn’t just a cookie-cutter RC car sled:


Maker Faire 2014 Highlights: Manufacturing

$
0
0
I stopped by the Full Spectrum Laser booth again this year.  People often ask me for recommendations on 3D printers, and I usually steer them toward lasers instead.  They’re super easy to use and work on a wide range of materials much cheaper than PLA filament.

Full Spectrum’s entry-level laser is $3500, far cheaper than the fancy Epilog lasers, so I’ve always figured that’s what I’d buy if I needed a laser.  Recently, though, a friend told me about hassles with the control software on a Full Spectrum laser.

I asked them about this at their booth, and they said that their latest “fifth generation” entry level lasers use a fancy control board from their more expensive models, and work a lot better than previous models.  So I’m cautiously optimistic, and still a big fan of lasers in general.


Looking Glass Factory slices up a 3D model and prints each slice on transparent film, then laminates the film together and embeds it in a solid block of plastic.  Here’s a 3d model of lower Manhattan they managed to scrape from Google Earth:


Imagineer James Durand and his wife (who’s a Mechanical Engineer at SpaceX, naturally) showed off James’s built-from-scratch blow-molding machine.  It heats polyethylene wax to 110C, injects it into a cooled metal mold, which solidifies the plastic touching the mold.  Then it blasts compressed air in to force out the remaining molten plastic, leaving a shell.

They cut the molds on the CNC mill in their living room, and had entertaining stories about second degree burns from early prototypes which motivated them to build the clear plastic cover sooner rather than later.

I believe they used an Industrino for the controller.  The electronics were nicely mounted over bus bars near the bottom of the enclosure.

I can’t find any photos of the completed machine, but that’s partly because they finished it just in time for Maker Faire!

Just across the aisle was this $600 injection-molding machine that’s surprisingly simple.  A heated reservoir melts plastic pellets and attaches to the spindle of your drill press.  Clamp your mold underneath the nozzle at the bottom of the reservoir, then force the plastic into the mold by lowering the quill on the drill press.

I got to see an actual PocketNC and meet Matt and Michelle, the husband-and-wife team of Mechanical Engineers designing an ambitious and beautiful 5-axis CNC mill from scratch.  They both quit their jobs a few years back to pursue their dream, and I really wish them well.


Their biggest holdup at the moment is software.  They have a few options when it comes to software for translating G-code, the decades-old language universally used by CNC mills for describing where to go and when, into the pulses that advance the stepper motors.

LinuxCNC is the oldest and most mature option, but also the hardest to hack on -- even the build process was intimidating to me, and I’m a software guy.

GRBL is another option.  This package has to be small, since it compiles small enough to fit on ATMEGA arduino boards.  I recently hacked RaspberryPi support into GRBL, and I was impressed at the code and comment quality.  Unfortunately for PocketNC, GRBL is built around cartesian coordinates: linear X, Y and Z axes all at right angles.  PocketNC, a 5-axis mill, has normal X, Y and Z axes, but also has two rotary axes.

The third option is the Syntheos TinyG.  They had a booth with a pendulum demo like this one showing off their third-derivative motion controller:

It’s not obvious to me which of these is best for PocketNC, but it is clear that we software guys should get our acts together so that we don’t hold up awesome projects like PocketNC.

Maker Faire 2014 Highlights: Electronics

$
0
0
robopeak showed off their $400 360-degree LIDAR unit with 6m range.  Not as polished as the $1150 Hokuyo, but about the same size and a whole lot cheaper.

They also had a 2.8” USB LCD touchscreen display for $35, which I couldn’t resist:

I almost bought an IFC6410 from inforce’s booth.  It’s basically an Android phone main board in a pico-ITX form factor.  With a Quad-core snapdragon 600, 2GB RAM, wifi, uHDMI, sata, gigabit ethernet and more, it was by far the fastest and most feature rich of the proto boards I saw.  They paired it with Ytai Ben-Tsvi’s IOIO board to drive some robots, but I think of these boards more as hackable Androids.

Unfortunately, they didn’t have any boards to sell on-site, and the price was $60 or $75 depending who I asked, but then ballooned to $100 with shipping, while the website price is listed at a “limited time promotion price” of $150 (but $75 with a promo code they mention in a blog post).   I was still game at $100, but after filling out my shipping address and email address, they handed me a 6-page license agreement to sign.  

At that point I gave up.  It’s a shame, because this board has cutting-edge hardware, and I’m excited to see makers with their hands on it, and not just big companies working on next-gen phones in secret.  

To me it’s a manifestation of the exploding maker and big-industry mobile spaces starting to intersect in earnest.  I’m excited for the big mobile players like Qualcomm to bring their cutting-edge hardware to the table, and I hope they can learn from the best of the makers by being transparent, consistent and plain-dealing.  Pick a price point, ditch the crazy EULA and multi-week lead time, and they’ll have a hot item on their hands.


One board I did manage to buy is this Mojo board from Embedded Micro, an Arduino-sized board with an Atmega 32U4 and a Spartan 6 FPGA.  That board plus a shield with 32MB of SDRAM came in under $100.

I’m excited to play with it, although this $200 MicroZed looks more impressive, with more respectable CPU, RAM and storage specs.

The Good and the Bad of the Internet of Things

The Good

Where I really got excited was Seeed’s booth.  They have a line of tiny Arduino-compatible boards and accessories called Xadow.  Instead of Arduino’s standardized header pins, Xadow uses flex cables to connect their boards, allowing a lot more mounting configurations.
I bought their CPU board and one of basically every accessory they had on hand for a grand total of right around $100.  I got a CPU board, battery, tiny OLED display, magnetometer, 9DOF IMU, vibrator, RTC and storage board.  Unfortunately, they were out of GPS and Bluetooth boards.

I’m really excited by these super tiny, feature-rich boards, especially as the wearables market heats up.

The other product is more well known: spark.io.  It’s a small arduino-compatible module with a wifi chipset, and a very clever technique for bootstrapping onto new wifi networks: an app on your smartphone sends out UDP datagrams with encrypted data that’s opaque to the Spark module (since the keys to join the network are precisely what it lacks), but whose size encodes the information the Spark module needs.  The person at the booth described it as a sort of morse code for wifi.


They didn’t have any modules to give out due to overwhelming demand, but they’re starting to ship now as fast as they can make them.

The Bad

As much as I like the product, the Electric Imp looks like it’s on the bad side.  Their device is sort of a programmable eye-fi: a controller and wifi chipset in an SD card form factor:

They have a clever approach to the problem of connecting these devices to a wifi network: load an app on your phone which flashes the screen to send the details to the imp via a photodiode embedded in the back side of the card.
Their director of sales, Peter Keyashian, explained their business model as a sort of turnkey Internet of Things: let them worry about the cloud service, microcontroller and wifi parts of a home appliance, and just keep building washing machines or dishwashers or whatever you’re good at.

Peter graciously gave me an Imp and dev board for free, and I was excited to try it out, until I showed it to a friend of mine.  He pointed out that the device is locked to their cloud service, and that they’re planning on charging for it down the line.

So that pretty much kills the excitement for me.  I had assumed the board would come ready to interoperate with their cloud service, but that if that wasn’t the right solution for me, I’d be able to reflash it to do, well, whatever else I needed it to.  But that isn’t how they’ve chosen to do it. Instead, they’re building a walled garden where the device is tied to their service, and they plan to charge for it down the line.


Visible light spectrum as the sun sets

$
0
0
Today I played with a ColorMunki Design, using it with argyll in Linux to record the spectrum of ambient light in the sky as the sun set.

I ran "spotread -a -H -s log.txt" to record using the ambient diffuser, in high res mode (3.3nm per sample instead of 10nm per sample), and recording tab-separated values to log.txt. 

Normally spotread waits for a keypress between readings, so I hacked it up to record continuously.  It was tricky to figure out how to do that; it took me a while to chase into munki_imp.c, in munki_imp_measure, short-circuiting the loop that waits for user input:
  if (m->trig == inst_opt_trig_user_switch) { 
    m->hide_switch = 1;            /* Supress switch events */ 
#ifdef USE_THREAD 
    { 
      int currcount = m->switch_count;    /* Variable set by thread */ 
      while (currcount == m->switch_count) { 
            ev = MUNKI_USER_TRIG; 
            user_trig = 1; 
            break;            /* Trigger */
In high-res mode it reports 380nm-730nm in 3.33nm increments every 3-4 seconds.  I let it run in my shaded backyard while the sun was setting, collecting through the ColorMunki's ambient diffuser pointed upward, from 7:33pm to 8:32pm (Sunset was 8:29pm tonight).

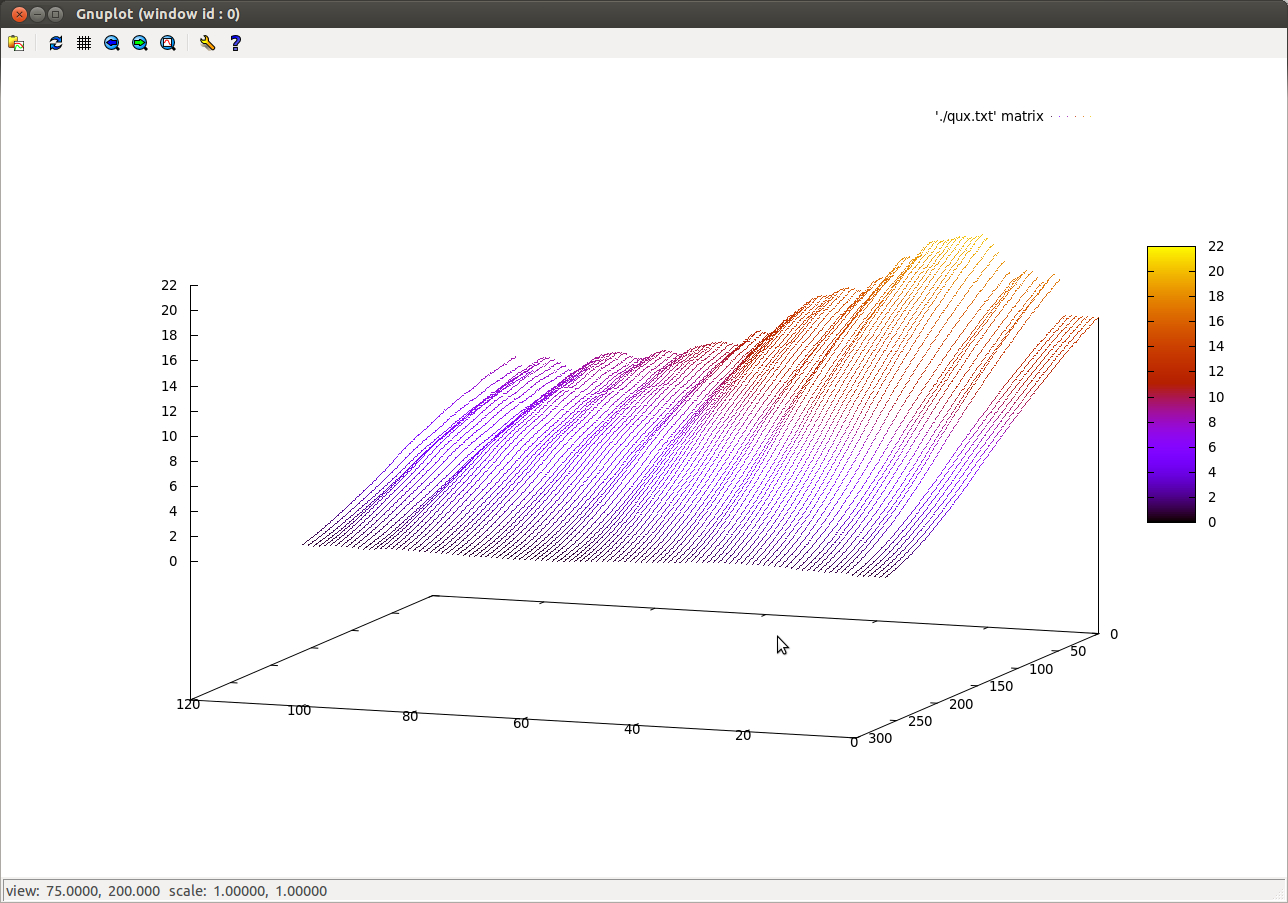
Here's a gnuplot of the data.  The colors help see the shape of the plot but have nothing to do with wavelength.  Back to front is increasing time (you can see the sky getting darker as the plot comes toward us), and wavelength goes from red on the left to blue on the right.  So the main thing that happened during this interval is that the blues were attenuated as it got dark.


To see the spectral shift over time, regardless of overall brightness, I normalized the data so that the max intensity wavelength was 1.0 in each sample.  Here's that plot:

(I wish there was a good way to generate an interactive plot, or at least an animated gif).  

Here I've rotated the graph around, so that time increases as we go from front to back, and we have red on the right this time with blue on the left.  So with the normalization you can see that blue remains the dominant color, but as it gets later in the evening, the reds start coming up (red sunset perhaps?).  Overall the curves are pretty interesting -- the shortest blues (relatively) decrease, the greens peak in the middle, and lots of increase in the reds as the sun sets.

It decided to stop after an hour when it decided it wanted to be recalibrated, which was disappointing because it meant it didn't record past sunset.

The gnuplot command for the second plot was this.  It took me forever to find "matrix", which lets it accept a data file full of Z values (instead of rows of x,y,z), and "every", which let me decimate to a manageable number of points:

gnuplot> splot './normalized.txt' every 10:5 matrix palette with impulses

Seeed Xadow "couldn't find a Leonardo" / "buffered memory access not supported" error when uploading

$
0
0
Spent an hour or two trying to figure out why I couldn't upload sketches from arduino to my Xadow board.  Turns out the serial port wasn't selected in Tools... Serial Port (even though /dev/ttyACM0 was the only option available).  Selected that and now it works great.

Xadow analogRead

$
0
0
Updated: figured it out

I can't make sense of the pin mapping on this Xadow board to read analog values.  Note that analogRead() has funny behavior to start with.  But I looped through pins 18-29 (A0..A10 in pins_arduino.h), and the only one that came up with anything on analogRead() was 23, which seems to correspond with the pin labeled SCL on the breakout board.

I can't find anything that would explain how SCL/23/A5 relate to each other, or what other values would even be sensible to try.  There's a pin labeled A5 on the board, but pins_arduino.h #defines it as 23, and somehow that ends up on the pin labeled SCL.

At least I found one pin on which I can read the ADC.

Xadow connectors aren't interchangeable

$
0
0
Well that wasted an embarrassing amount of time.  The xadow boards have flex cable connectors at each end so that you can daisy chain them.  I had the breakout board hooked up the wrong way, and spent several hours wondering why the A5 ADC input was showing up on the SCL pin.  Rotated it 180 degrees and now it works right.

Xadow PWM only supports 1 (or 2) pins

$
0
0
As far as I can tell, the only pin on the Xadow flex cable that you can do PWM with (at least using the arduino IDE) is SCL.   (And if you screw up and plug in the breakout board backward, SCL will show up on the pin labeled A5).

You can also do PWM on the green LED, but that isn't routed to the flex cable.

So that sucks, especially since Xadow is billed as having 7 PWM channels (which the underlying Atmel chip does indeed have).

IOIO otg + Ubuntu quickstart

$
0
0
I picked up a IOIO board from SparkFun.  I want to control its PWM channels from my Ubuntu workstation (no android involved).  Fortunately, I work near Ytai, so I was able to pick his brain when I got stuck!

This was a reasonable place to start, and helped me get my udev rule set up so that I saw /dev/IOIO0 when I plugged in the board:
https://github.com/ytai/ioio/wiki/Using-IOIO-With-a-PC

It also reminded me to set the switch on "A" instead of "H".

Next I downloaded App-IOIO504.zip from here:
https://github.com/ytai/ioio/wiki/Downloads

I unzipped it, and tried to run HelloIOIOSwing.jar:
$ java -jar HelloIOIOSwing.jar -Dioio.SerialPorts=/dev/IOIO0
[D/IOIOConnectionRegistry] Successfully added bootstrap class: ioio.lib.pc.SerialPortIOIOConnectionBootstrap
[W/SerialPortIOIOConnectionBootstrap] ioio.SerialPorts not defined.
Will attempt to enumerate all possible ports (slow) and connect to a IOIO over each one.
To fix, add the -Dioio.SerialPorts=xyz argument to the java command line, where xyz is a colon-separated list of port identifiers, e.g. COM1:COM2.
[D/SerialPortIOIOConnectionBootstrap] Adding serial port ttyACM0
[D/SerialPortIOIOConnectionBootstrap] Adding serial port ttyS4
Exception in thread "AWT-EventQueue-0" purejavacomm.PureJavaIllegalStateException: JTermios call returned -1 at class purejavacomm.PureJavaSerialPort line 1107
...

We hypothesized that it didn't like the -D at the end, so we tried again with different argument order, and that got us a little farther:
$ java -Dioio.SerialPorts=ACM0 -jar HelloIOIOSwing.jar
[D/IOIOConnectionRegistry] Successfully added bootstrap class: ioio.lib.pc.SerialPortIOIOConnectionBootstrap
[D/SerialPortIOIOConnectionBootstrap] Adding serial port ACM0
[D/IOIOImpl] Waiting for IOIO connection
[V/IOIOImpl] Waiting for underlying connection
...

Ytai had me install screen and run $ screen /dev/IOIO0, and we verified that it got back some printable data from IOIO when it started up, so we knew the board was alive.  Next we checked what firmware revision was on the board using ioiodude (also from the downloads page above).

We also downloaded the latest version of the firmware, App-IOIO0500.ioioapp, by clicking on the QR code next to the link to the .zip file.

$ unzip IOIODude-0102.zip
$ ./ioiodude --port=/dev/IOIO0 versions
IOIO Application detected.

Hardware version: SPRK0020
Bootloader version: IOIO0400
Application version: IOIO0330

We rebooted the IOIO otg in bootloader mode so that it could be reflashed.  That involved jumpering the "boot" pin to ground while powering up the board.  Then we could reflash it:

$ ./ioiodude --port=/dev/IOIO0 write App-IOIO0500.ioioapp 
Comparing fingerprints...
Fingerprint mismatch.
Writing image...
[########################################]
Writing fingerprint...
Done.

After that, the Swing and Console apps worked:
$ java -Dioio.SerialPorts=/dev/IOIO0 -jar HelloIOIOSwing.jar 
[D/IOIOConnectionRegistry] Successfully added bootstrap class: ioio.lib.pc.SerialPortIOIOConnectionBootstrap
[D/SerialPortIOIOConnectionBootstrap] Adding serial port /dev/IOIO0
[D/IOIOImpl] Waiting for IOIO connection
[V/IOIOImpl] Waiting for underlying connection
[V/IOIOImpl] Waiting for handshake
[I/IncomingState] IOIO Connection established. Hardware ID: SPRK0020 Bootloader ID: IOIO0400 Firmware ID: IOIO0500
[V/IOIOImpl] Querying for required interface ID
[V/IOIOImpl] Required interface ID is supported
[I/IOIOImpl] IOIO connection established

$ java -Dioio.SerialPorts=/dev/IOIO0 -jar HelloIOIOConle.jar 
[D/IOIOConnectionRegistry] Successfully added bootstrap class: ioio.lib.pc.SerialPortIOIOConnectionBootstrap
[D/SerialPortIOIOConnectionBootstrap] Adding serial port /dev/IOIO0
[D/IOIOImpl] Waiting for IOIO connection
[V/IOIOImpl] Waiting for underlying connection
[V/IOIOImpl] Waiting for handshake
[I/IncomingState] IOIO Connection established. Hardware ID: SPRK0020 Bootloader ID: IOIO0400 Firmware ID: IOIO0500
[V/IOIOImpl] Querying for required interface ID
[V/IOIOImpl] Required interface ID is supported
[I/IOIOImpl] IOIO connection established
T
Unknown input. t=toggle, n=on, f=off, q=quit.
t
q

I want to make a simple app to control PWM channels on the IOIO board, and I'm not an eclipse user, so Ytai showed me how to extract and create the appropriate .jar files.  First I unpacked the HelloIOIOSwing app:

$ mkdir unpacked
$ cd unpacked/
$ jar -xvf ../HelloIOIOSwing.jar 

Then he had me delete the ioio/examples directory and make a jar file for the IOIO framework:
$ cd ioio
$  rm -rf examples/
$ cd ..
$ jar -cvf ioio.jar ioio

ioio.jar, jna-4.0.0.jar and purejavacomm-0.0.21.jar should then suffice to let me build my own app.

I put the three jarfiles in a clean directory, then I downloaded HelloIOIOConsole.java from here:
https://github.com/ytai/ioio/tree/6189875afe0cf4b430a0a226425edc6df2e9b4f8/software/applications/pc/HelloIOIOConsole/src/ioio/examples/hello_console

and put it in a subdirectory ioio/examples/hello_console/

I compiled it like so:
$ javac -cp .:ioio.jar:purejavacomm-0.0.21.jar:jna-4.0.0.jar ioio/examples/hello_console/HelloIOIOConsole.java

And it worked!

$ java -Dioio.SerialPorts=/dev/IOIO0 -cp .:ioio.jar:purejavacomm-0.0.21.jar:jna-4.0.0.jar ioio/examples/hello_console/HelloIOIOConsole 
[D/IOIOConnectionRegistry] Successfully added bootstrap class: ioio.lib.pc.SerialPortIOIOConnectionBootstrap
[D/SerialPortIOIOConnectionBootstrap] Adding serial port /dev/IOIO0
[D/IOIOImpl] Waiting for IOIO connection
[V/IOIOImpl] Waiting for underlying connection
[V/IOIOImpl] Waiting for handshake
[I/IncomingState] IOIO Connection established. Hardware ID: SPRK0020 Bootloader ID: IOIO0400 Firmware ID: IOIO0500
[V/IOIOImpl] Querying for required interface ID
[V/IOIOImpl] Required interface ID is supported
[I/IOIOImpl] IOIO connection established
t
t
^C

Point Grey cameras suck.

$
0
0
Spent way too many hours fighting with two different Flea3 cameras from Point Grey lately.  All the software is hidden behind a login page, and they'll spam you if you sign up.  Lots of different obscure and unhelpful error messages, and one of the cameras bricked when I tried a firmware upgrade.

It's not too much to ask for a machine vision camera that:
 - Works with linux
 - Has Open Source software that I can "apt-get install"

Suggestions for alternatives welcome.

Polaroid Cube sucks

$
0
0
I tried out the new Polaroid Cube camera today, and figured I'd start with the basic outdoor selfie.  And this pretty much sums it up:


If you're going to make a camera without a display, it probably shouldn't completely blow out in afternoon fall sunlight.

Un-bricking a Parrot Ar.Drone 2.0 with a Xadow (arduino)

$
0
0
The Ar.Drone 2.0 creates a wifi access point using network 192.168.1.*, which conflicted with another network I was using on my laptop.  I telnetted in and changed bin/wifi_setup.sh to use 10.0.0. instead, but somehow when I rebooted, the Ar.Drone managed to assign my laptop the illegal address 0.0.0.2, which the rest of the TCP/IP stack refused to cooperate with.

I ordered a CP2102 USB adapter which people said they'd had success using to talk to the 1.8v TTL serial port on the Ar.Drone 2.0, but didn't want to wait for it to arrive.

So instead, I found an arduino board that runs on 3.3v and supports USB serial.  Some arduino variants won't do USB serial at all (even if they can be programmed over USB), and others tie the TX/RX pins to the USB serial.  The latter would have been fine, except that those boards tend to use 5v instead of 3.3v.

The xadow main + breakout boards fit the bill.  Unfortunately, the xadow board requires some tweaks to the arduino installation, but once I had that set up, I was able to use this sketch to link up the USB and TTL serial ports:

void setup() {
  Serial.begin(115200);
  Serial1.begin(115200);
}
void loop() {
  if (Serial.available()) {
    int r = Serial.read();
    Serial1.write(r);
  }
  if (Serial1.available()) {
    int r = Serial1.read();
    Serial.write(r);
  }
}


Then I connected the grounds together (pin3 on the header on the bottom of the Ar.Drone 2.0, accessible by removing a black rectangular sticker).  Pin5 went to rx on the xadow breakout board, then I connected tx to pin6 through a 3.3k resistor to limit the current that I think ends up flowing from the 3.3v xadow board through the protection diodes in the IC in the Ar.Drone that's receiving the data and running at 1.8v.  A proper level conversion would have been better, but the Ar.Drone doesn't seem to mind.

Once I got it connected, plugging in the battery on the Ar.Drone booted it up, and I saw the startup messages in the arduino serial monitor.  I exited out of the arduino IDE, then used 'screen /dev/ttyACM0' to connect to the USB serial port in a way that supports things like colors and arrow keys.

Unfortunately, I didn't look at ifconfig before I fixed the wifi_setup.sh script and rebooted.  The script looked fine, and later I was able to change BASE_ADDRESS back to 10.0.0. and it seemed to work fine.  So the original failure is a mystery to me.

Radial Mill

$
0
0


I see lots of small CNC milling machines these days, generally built like 3d printers: made of plastic or wood, or aluminum extrusion and bearings.  But unlike a 3d printer, subtractive milling involves huge forces, especially if you're trying to remove lots of metal.

The other thing I observe is that almost all the machines use cartesian axes: linear guides that move in perpendicular directions.  This makes a lot of sense in a manual mill where you're moving the axes by hand, but when it's computer-controlled, it's easy to do the math for all sorts of crazy coordinate systems.  So it makes sense to improve the machine mechanically in exchange for software complexity that's easy to share and replicate.

So I set out to make a machine that:

  • Is small enough to fit on a benchtop.  (36,000 pound machining centers are great, but it's always seemed funny to me that such huge machines usually work on workpieces only a few inches across)
  • Is stiff enough to accurately and quickly remove lots of metal.  I don't mind if it's a few hundred pounds as long as it's compact.
  • Exchanges as much mechanical complexity as possible to software.

Here's the result:


The two discs are flywheels from a Chevy smallblock, driven directly by steppers.  The upper disc can move the spindle on an arc from the center to the edge of the lower disc, where the workpiece is mounted.  So by rotating the two discs appropriately, we can put the spindle over any point on the lower disc.

One nifty side effect of this approach is that we get more torque and more accuracy in the lower table the closer we get to the center.


The complexity front was a huge success: the whole machine ends up being about a dozen parts in all.  8 non-off-the-shelf parts, 5 of which are used twice.

  • Table and two legs
  • Neck
  • Upper table
  • Stepper mounting plate (2)
  • Flywheels (2)
  • Wheel bearings (4), axle (2), top cap (2), bottom cap (2)


The flywheels are cast iron, which is great for vibration damping.  And the wheel bearings are from a Ford F-450 truck, and rated for thousands of pounds of load.  The axle is a length of 2 inch steel bar, and the top and bottom caps preload the bearings and hold the assembly together.  Here's the assembly, with prototype MDF end caps:


By comparison, here's a MakerSlide carriage picture I found at buildlog.net.  It has the custom aluminum extrusion, two mounting plates, six bearings (which typically use eccentric mounts so that they can be tensioned against the extrusion) and a long drive belt:


Way less rigid, and way more complicated.

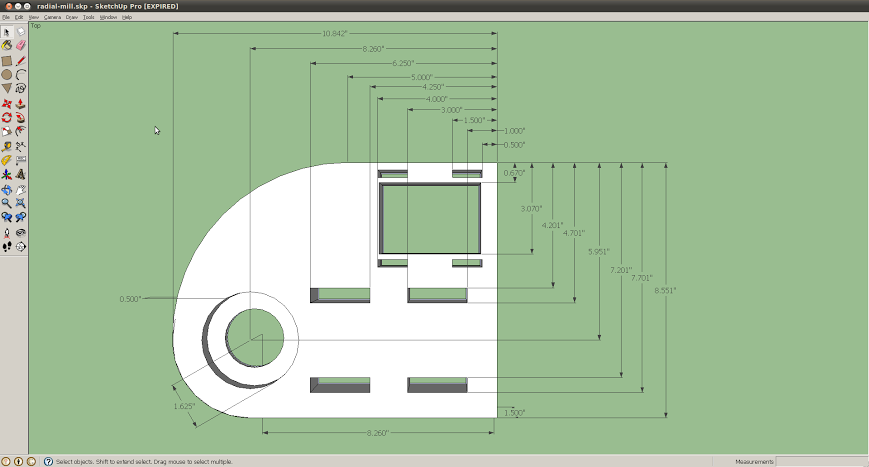
All of the parts are straightforward to mill on a manual milling machine.  The top table is the only part with a curved contour, but it's not a critical dimension, and I just did it because I happened to be using a CNC Bridgeport.  Here you can see all the dimension labels I added in Sketchup to help me program the Bridgeport by hand:


Not particularly relevant to the machine itself, but when it came to choosing a controller, I opted to port GRBL to Raspberry Pi rather than using an Arduino.  The board costs about the same and has a lot more power, which I figured might be handy if I needed to implement the coordinate transformation in using a CPU-intensive hack.

In the next section I'll cover the many things that are still missing, but here's the end result for the machine in its current state.  I taped a marker to the spindle and had it draw the Hackaday skull and wrenches.  No Z-axis means no lifting the pen between segments, and no coordinate transform means that the image gets distorted in interesting ways, although it's still quite recognizable when drawn in that part of the space:


Things to improve

This is just a prototype.  Here's what needs improvement:

  • Backlash.  I measured about 0.010" backlash in the ring and spur gears, which is great for a starter motor on an engine, but terrible for a CNC machine.  I found a worm gear that will drive those threads with more torque (and more steps per inch), but it'd increase the mechanical complexity and I'm not sure if it'd improve the lash.
  • There's no Z axis!  Fittingly for a machine that's all about rotary axes, the up-down Z-axis, which needs to be linear, ended up taking more time than the rest of the project combined.  I never did manage to create linear motion that I was happy with, so to get it into some semblance of working I finally just bored out a piece of aluminum and held the spindle in place with a big set screw.
  • Software support.  The math for rectangular->polar coordinates really is quite simple, but integrating it with a G-code interpreter is another matter.  I managed to port GRBL to Raspberry Pi, but its assumptions about rectangular coordinates are baked in pretty deeply.  My research into TinyG and LinuxCNC don't make me optimistic.
  • Most of the machine is still made out of prototype MDF parts.  The plan was to start with MDF, then re-do with aluminum, then use steel or cast iron for the final draft.  I never got that far, so the black parts you see are just spray-painted MDF.
  • Work-holding, tuning and calibration are completely unaddressed.


Building new drawers

$
0
0
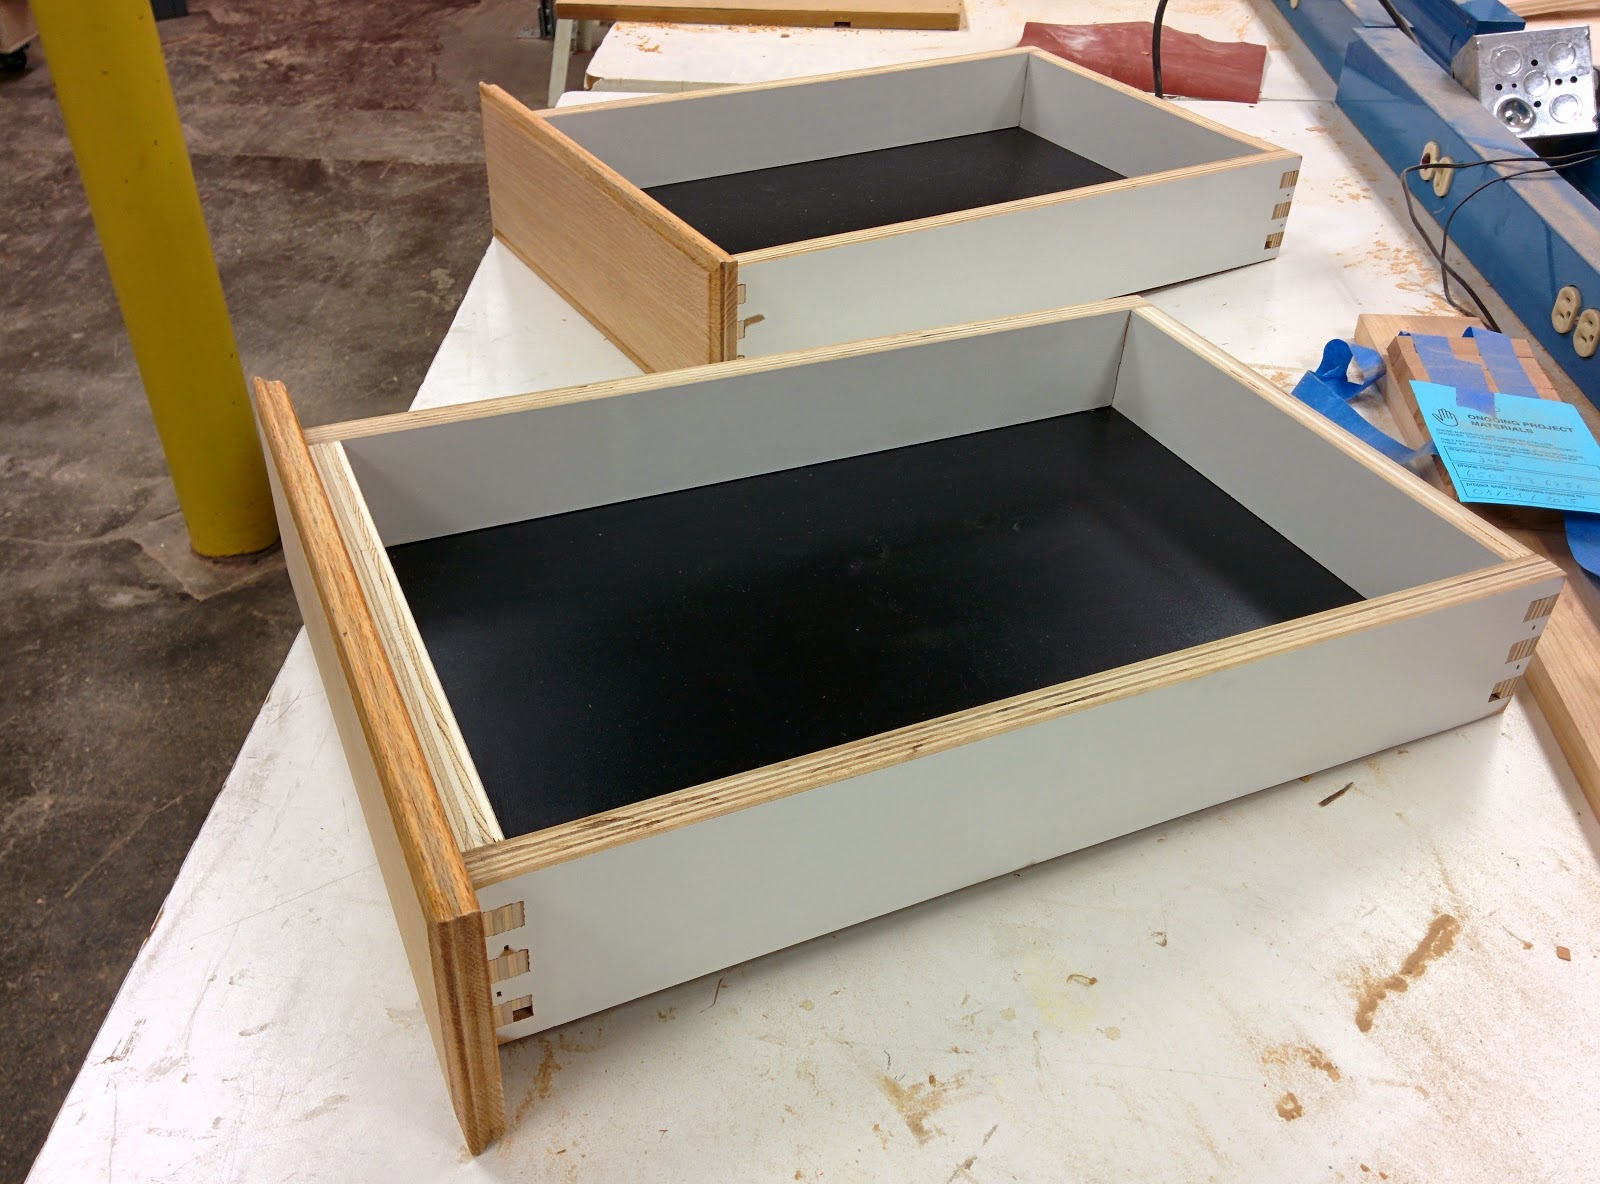
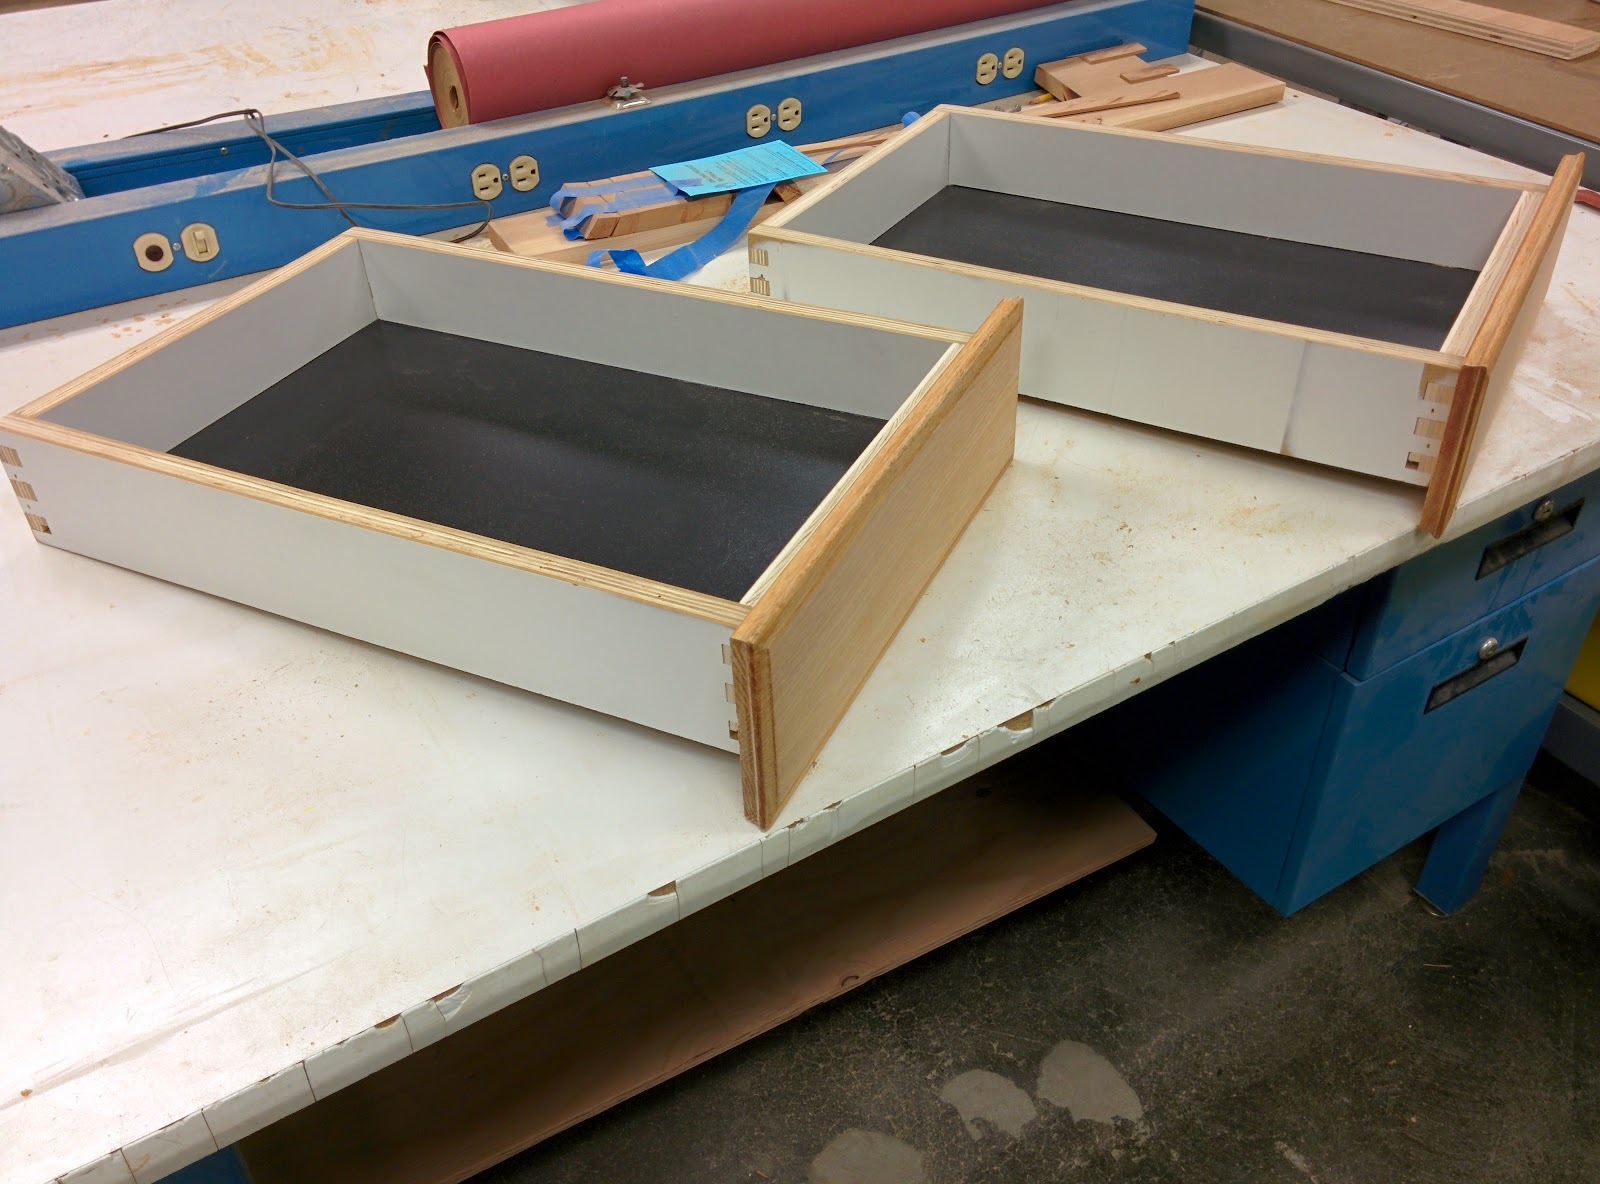
The crappy drawers in my kitchen were falling apart, so I took the faceplaces off and built new drawers.  I used 3/4" melamine-backed plywood for the sides, and 1/4" melamine-backed MDF for the bottom.  You can see a notch in the lowest tenon of each box joint where I cut the dado for the bottom.

I'm happy with how solid they turned out, but I managed to chip the melamine and sand through it in places when I was sanding the tails of the box joints flush.  So that's a cosmetic annoyance.

Everything's glued and nailed in place.  The nails through the box joints are another cosmetic issue, but I wanted the strength.  I guess if I cared enough, I could fill and paint it all smooth.


Paperclip Maximizer 1.0

$
0
0
The AI does not hate you, nor does it love you, but you are made out of atoms which it can use for something else. 
—Eliezer Yudkowsky
A Paperclip Maximizer is an artificial intelligence whose sole purpose is to make as many paperclips as possible, which to the chagrin of its creator, ends up destroying the world in the process.  It's a way of explaining why the folks at MIRI think it's important to study ways of making AI that will benefit rather than harm us.
I have several friends who study AI, so I decided to creatively misunderstand the notion of a Paperclip Maximizer, and thus conclude that AI researchers are inexplicably preoccupied with paper clips.  So to ensure they never wanted for fasteners, I ordered a whole panoply of paperclips from around the internet and had them shipped to their desks over the course of a few weeks.

This amused me greatly, but after a few weeks it was time to take it to the next level.  Thus was born Paperclip Maximizer 1.0:


Here it is in action, with early prototype clips on display that didn't quite have that je ne sais quoi:


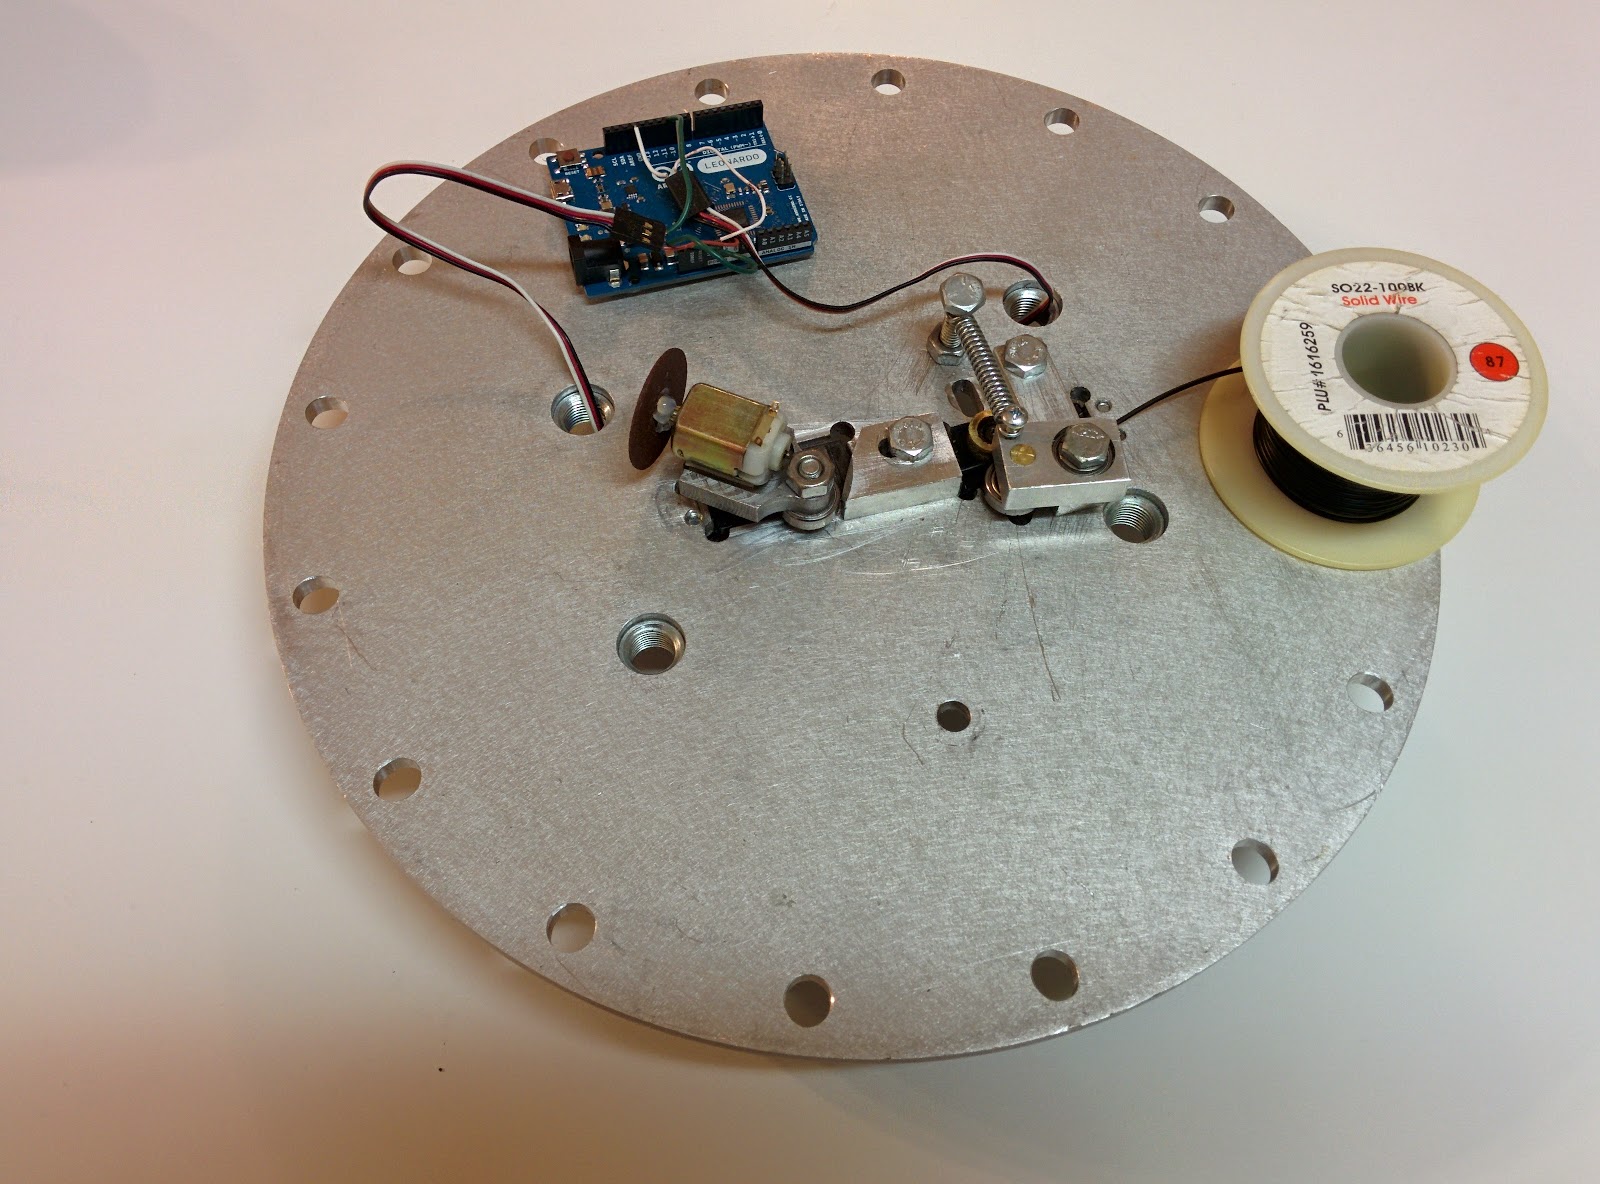
The mechanism is relatively simple, but taught me a lot about the subtleties of wire bending.  Two GWS S125 1T sail winch servos provide all the locomotion, controlled by an Arduino Leonardo and about 2 pages of code.

These particular servos have a lot more range of motion than normal servos, and are also easy to modify for continuous rotation.  That was important for the wire feed servo, which always needs to turn the same direction.  When you disassemble this particular servo, you can just remove the gear that connects the axle to the potentiometer.  Then when you drive it, if you tell it to move clockwise of where you left the pot, it'll turn clockwise forever, and vice versa.

The feed wheel is a piece of brass rod I knurled on the lathe to give it some bite.  It's pressed onto the servo, which means I needed to cut down a servo horn to a perfect cylinder.  To do that, I wrote a program for the Arduino to make it rotate continuously, then clamped the servo upright in the mill.  Then while the servo was spinning, I moved in with a spinning end mill.

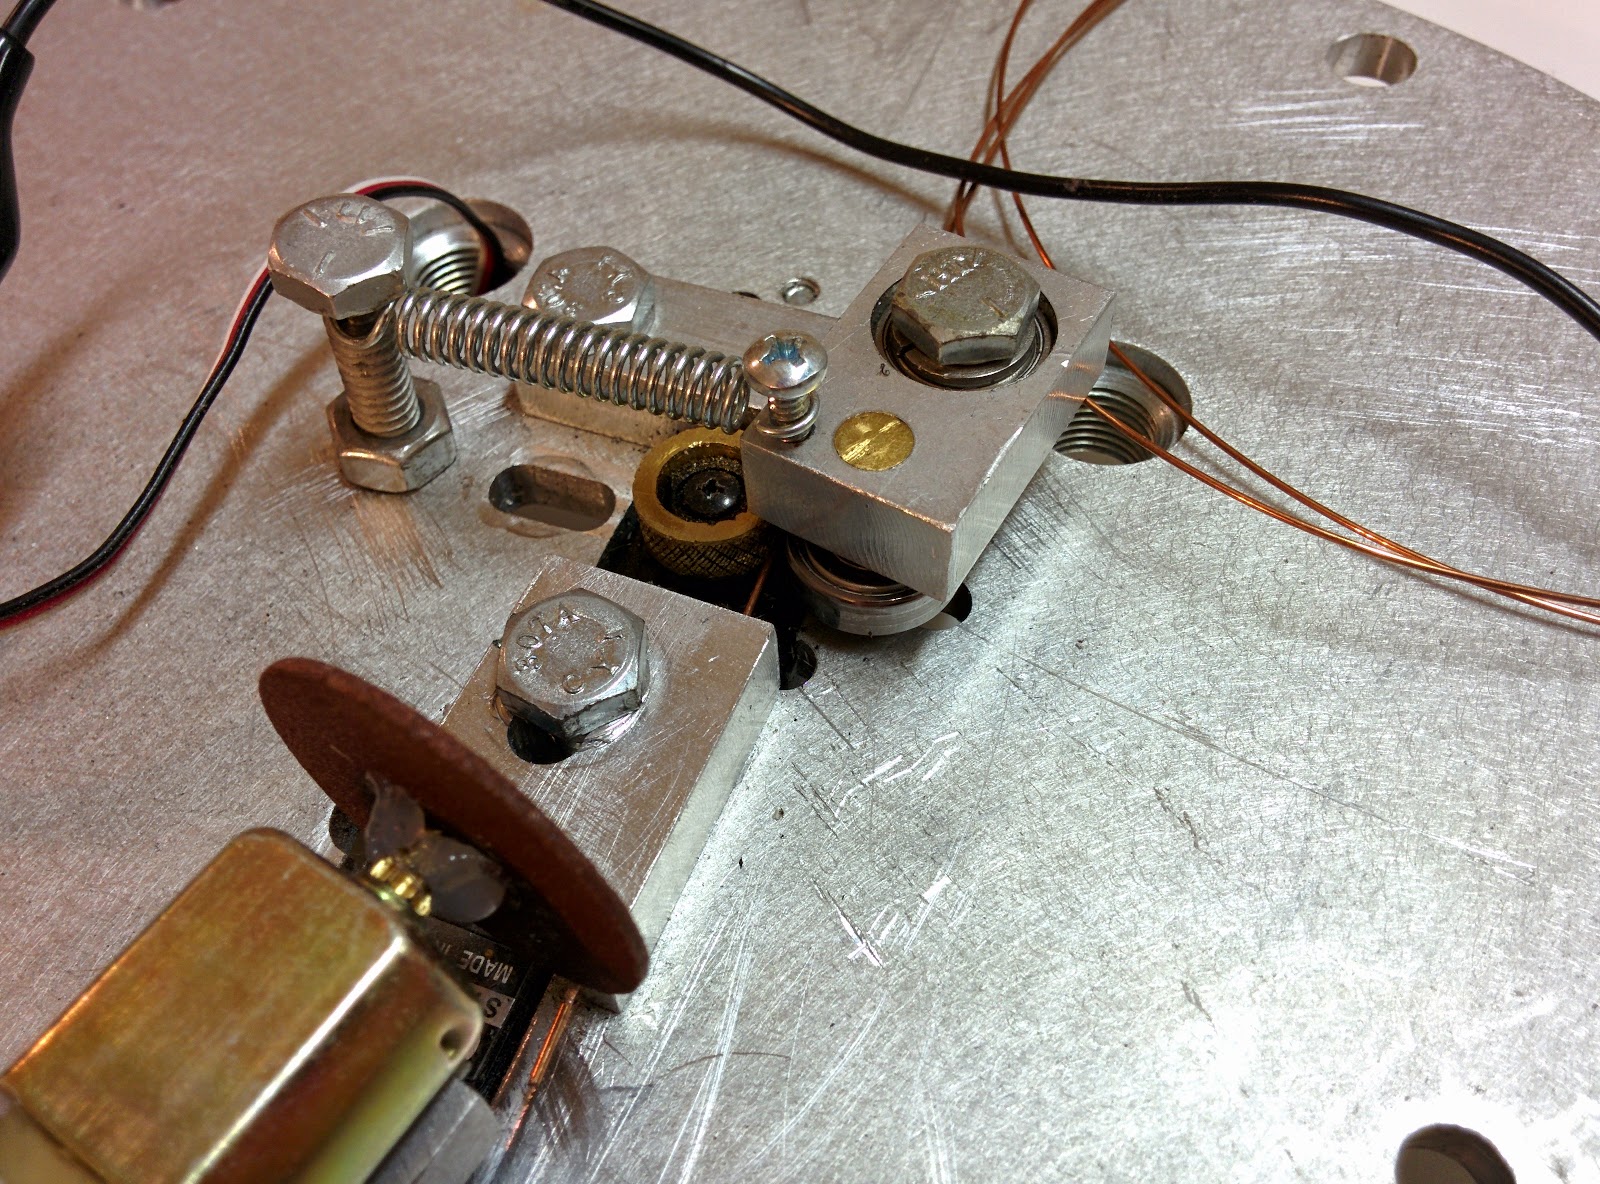
Next to the feed wheel, you can see a bearing of about the same diameter.  Its job is to hold the wire against the feed wheel.  Originally I bolted the bearing in place, but the wire wouldn't feed consistently.  Turns out there's enough eccentricity in the feed wheel that I needed to let the bearing move in and out slightly.  So that's why you can see a big coil spring overhead, tensioning the bearing against the feed wheel and compressing the wire.  If you watch the video carefully, you can see the arm move in and out slightly on the long feeds, broadcasting to the world exactly how bad my lathe skills are.


Next comes the feed block.  Its job is to keep the wire straight and hold it in place while the bending unit bends the wire.  Like the rest of the project, this turns out to be much more constrained than I expected: if there's too much space between the block and the feed wheel, then when the bender pushes back on the wire, it can bow and kink.  And if there's too much space between the block and the bender, you can't get a tight bend in the wire.

I'd have liked to make the feed block longer to give me more room for the other components.  But it needs a small diameter hole to pass the wire, and small drill bits also tend to be short.  I think I even had to drill the block from both ends to reach all the way through with the bit I had available.

The bending head itself ended up also being pretty cramped.  It needed to extend high enough to leave room for the bearing that does the bending.  It's hard to see, but imagine the head starting out twice as thick as you see here:


I milled out all but a collar from the bottom half of the piece, and that's where it's attached to the servo.  You can just barely see that collar between the head and the servo, to the right of the bearing.  Then it had to reach over to the center of the bearing, but not crash into the feed block.  So I had the mill cut that nice curved shape that you see leading to the bearing nut.  But it wasn't a particularly critical dimension, so grinding the shape by hand would have worked just as well.  Then the head on the 1/4"-20 bolt that holds the bearing turned out to be a bit too thick, so I had to grind that to about half its normal thickness.

If you watch real wire bending machines, you'll see that they create different curves by feeding the wire while they adjust the benders.


Turns out it takes a lot of force to feed wire into a tight bend, and my feeder wasn't up to it.  So that's why I have to alternate feeding and bending, which I actually find quite delightful, since it adds to the quirky personality of the machine.  If I had known at the start that I wouldn't be able to feed while bending, I could have designed the machine to use a fixed bending finger instead of a bearing.  That would have made it a lot easier to make the tight bends needed for a paper clip -- since the bearing is round, it likes to deflect the wire back through the block as it approaches.

Since everything had to be jammed in close together, I was glad I chose to tap the mounting holes for the servos.  If I had to do the project over again, I'd save a lot of time by using acrylic on a laser.  But then I suppose I'd have to rearrange things, tap the acrylic, or maybe use some sort of press-in insert.


What about the big DC motor sitting on top of the bender?   That's the cutoff wheel:


I pressed down the factory plastic gear on the motor to expose more of the shaft, then hot glued on a dremel cutoff wheel.  The motor itself is held onto the bending head with double stick tape; not a great long-term solution.

The way it was supposed to work was to not reset the bender on the last bend, but instead keep moving past the wire.  Then I'd feed out the last leg of the paperclip, and then keep rotating the bending head clockwise until it brought around the cutoff wheel in to finish the job.

That's why you can see a dished out spot on top of the feed block -- I had to spend about 15 minutes manually and very gradually feeding the spinning wheel into the block so that it'd clear when moving into place, yet still end up close enough to the block to cut the wire instead of just deflecting it out of the way.

It's too bad that feature didn't work out, since the sparks you get with steel MIG welder wire make a great grand finale to the process!  But the motor is easy to stall against the wire, which generally also browns out the Arduino.  And about half the time, right at the end, the tiny sliver of remaining wire bends instead of cutting, leaving the finished paperclip attached to the next one.  Oh, and the cut also ends up being razor sharp: I lightly grazed my fingertip with one of the cutoff pieces of wire and ended up with a very clean, deep cut.  So that was the final nail in the coffin for the cutoff wheel.

Writing the Arduino code was one of the easiest parts of the project.  I invited my AI researcher friend over on a Saturday afternoon and we coded and tuned it over the course of an hour or two, making lots of misshapen proto-clips that you can see littered around in the video.  Everything is open loop: move the servo, wait, then move again.  For the wire feed, there are one or two values where the servo will stop because that's where I left the potentiometer when I modified the servo.  But the much better solution is to tell the servo library to detach, which stops the PWM signal to the servo, stopping it no matter where it thinks it is.

Intuition for Young's Modulus

$
0
0
Today I was trying to remember how to use Young's Modulus.  I eventually figured it out (I think), but when I went to check my intuition, nobody else was describing it in these terms.  So it's odd that this wouldn't be a well-known intuitive aid, which I guess means I might just be wrong about it.  If so, please point that out in the comments.

But the mental shortcut is this: Young's Modulus (aka the Elastic Modulus) tells us how much pressure we have to apply to a material to double its length.

For example: Aluminum has a modulus of elasticity of 10 million PSI.  So if you had a piece of aluminum bar stock 1 inch square, and you pulled on it with a force of 10 million pounds, it'd end up twice as long as it started.  

Now, in reality the bar would tear before it'd stretch that far, because the maximum elongation for aluminum tends to be less than 30%.  But remembering that "E = pressure required to double the length" gets you into the right place to use the units correctly (for example, to say that 1% of 10 million PSI would elongate our bar by 1%).

Ubuntu: use syndaemon disable touchpad while typing

$
0
0
As this page describes, syndaemon solves the problem of trying to type on a laptop and having the cursor jump somewhere else because it thinks you touched the touchpad:

http://www.webupd8.org/2009/11/ubuntu-automatically-disable-touchpad.html

Empirically testing the "three hats game"

$
0
0

After reading the brain teaser here, I couldn't convince myself that the solution was correct:

http://www.futilitycloset.com/2015/02/17/the-three-hats-game/


It still seems impossible to me that any player should be able to do better than 50% at guessing the color of his own hat. So I wrote a C program to try out the strategy across 10000 games and report what it found. And indeed it does seem to work. I'd paste the code, but blogger sucks at code formatting. So here it is instead:


https://gist.github.com/anonymous/b3e0a653097e61bec498

Viewing all 94 articles
Browse latest View live